
Veeam Agent for Windows: Migrate Agent Backups to Veeam Repository
![]() When Veeam released their first version of their Endpoint Backup I was hooked. An easy to use client backup tool that can save you from a lot of pain when something goes wrong with your client PC or laptop. I started with backing up my primary desktop to a Synology NAS share. When Veeam Backup and Replication 8.0 Update 2 (current version 9.5 Update 2) and Endpoint Backup 1.5 (current version Veeam Agent for Windows 2.0) was released, Veeam introduced the possibility to backup to a Veeam backup repository. In this post I will show how easy it is to migrate any existing Endpoint Backup to a Veeam Backup and Replication repository with your existing backup data.
When Veeam released their first version of their Endpoint Backup I was hooked. An easy to use client backup tool that can save you from a lot of pain when something goes wrong with your client PC or laptop. I started with backing up my primary desktop to a Synology NAS share. When Veeam Backup and Replication 8.0 Update 2 (current version 9.5 Update 2) and Endpoint Backup 1.5 (current version Veeam Agent for Windows 2.0) was released, Veeam introduced the possibility to backup to a Veeam backup repository. In this post I will show how easy it is to migrate any existing Endpoint Backup to a Veeam Backup and Replication repository with your existing backup data.
Veeam Agent for Windows “Shared Folder” Configuration
Currently I’m using the following configuration for one of my client machines.
Because this client does only have one disk, I’m going with the “Entire computer” configuration. For my main client I’m using Volume level backup to select only the OS drive and folders which are important.

At the beginning of using Veeam Agent for Windows I started with using “Shared folder” because I had no production Veeam Backup & Replication in place.

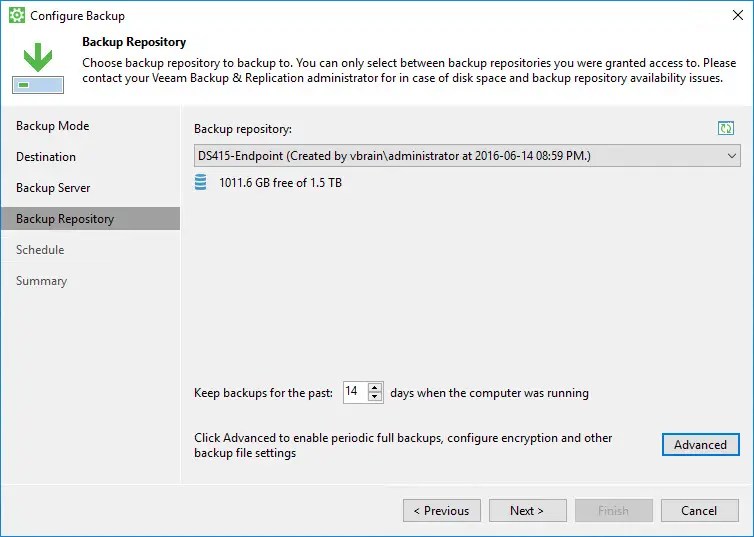
My shared folder is located on my Synology DS415+ in a folder called “Endpoint-Backup” with a retention time of 14 days.

My client backup is configured to start at 8PM and if the client if off during this time it should be backed up once when it is powered on. I also defined that a backup shouldn’t be triggered more often than every 24 hours. That means if I miss the 8PM backup window and the client powered on afterwards it will start doing a backup but it won’t be triggered anymore if I had also selected one of the events (Lock, Log off, etc.).

After the backup was running you can see a backup folder in your destination shared folder called “Backup Job CLIENTHOSTNAME“.

Veeam Agent for Windows “Veeam Backup & Replication Repository” Configuration
When I decided to move from “Shared Folder” to “Veeam Backup Repository” some things needs to be changed in the Agent configuration.
First we need to change the destination of the client backup image to “Veeam backup repository“.

Now we need to define our Veeam Backup & Replication Server. I’m using a specific Service User to connect to the repository. Be aware that per default all Agent access permissions are denied on all backup repositories.

To configure Agent permission on the repository go to Backup Infrastructure – Backup Repositories – right-click the repository and select Agent Permissions…
Here you now choose between allow access to everyone, deny access or allow access for a specific user or group.

If the repository permission is configured correctly, only the repositories with the right permissions should show up in the next dialog.
When everything is configured you will see the agent job running in your Backup & Replication Console.

After checking the backup location you will see that a new Agent backup was created. The reason for this is that Veeam Agent for Windows will create a new folder in the root of the backup repository. This is named after the user which was used for the connection to the Veeam Backup Server. In my case the complete path to my backup was “\VBRAIN_svc-veeam-ep\Backup_Job_CLIENTHOSTNAME”
Migrating the client agent backup folder to Veeam back repository
If the previous backup chain should be used the following steps need to be done:
- Delete the folder of the client machine which was created under the folder USERNAME
- Move the previous backup folder to folder USERNAME
- Go to the Veeam Backup & Replication Console – Backup Infrastructure – Backup Repositories, right-click the Agent repository and select Rescan. This should take 1-2 minutes but it will find the moved backup data. CAUTION: If this step is skipped or forgotten the backup will process but create a new backup folder with underscores instead of spaces.
- The new backup files will show up under Backup & Replication – Backup – Disk (imported).
- Restart the Veeam Agent for Windows backup job
- The backup files are now showing up under Backup & Replication – Backup – Disk.
After this procedure the previous created backup files will be used and an increment backup file will be created.
This concludes the post about Migrating Agent Backups to Veeam backup repositories. If you have any questions/feedback please leave it in the comments.
I plan to do this migration in my home lab soon, now I know exactly how I’ll go about doing it. Thank you for taking the time to write this up!